|
|

iPerf3 是一种用于主动测量 IP 网络上可实现的最大带宽的工具。它支持调整与时序、缓冲区和协议(TCP、UDP、带有 IPv4 和 IPv6 的 SCTP)相关的各种参数。对于每次测试,它都会报告带宽、损耗和其他参数。这是一个新的实现,它不与原始 iPerf 共享代码,也不向后兼容。iPerf 最初是由NLANR/DAST开发的。iPerf3 主要由ESnet /劳伦斯伯克利国家实验室开发。
iperf 系列工具执行主动测量以确定 IP 网络上可实现的最大带宽。它支持调整与时序、协议和缓冲区相关的各种参数。对于每次测试,它都会报告测得的吞吐量、损耗和其他参数。
此版本有时称为 iperf3,是对 NLANR / DAST 开发的原始版本的重新设计。iperf3 是一个从头开始的新实现,其目标是更小、更简单的代码库,以及可在其他程序中使用的功能库版本。iperf3 还整合了许多其他工具(如 nuttcp 和 netperf)中的功能,但原始 iperf 中缺少这些功能。例如,这些包括零复制模式和可选的 JSON 输出。请注意,iperf3与原始 iperf不向后兼容。
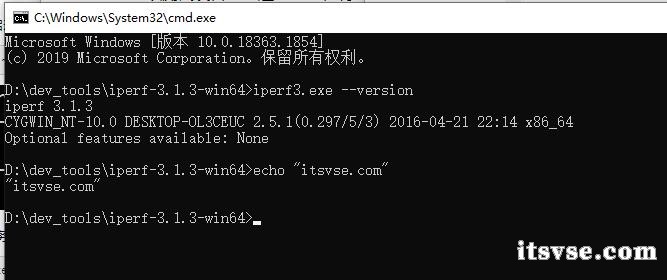
使用 iPerf3 可以测试设备网络通信速度,将 iPerf3 安装在两台电脑设备,一台作为服务端,一台作为客户端,通过 iPerf3 互相传送报文进行测试通信速度。
iPerf3 参数如下:
Usage: iperf [-s|-c host] [options]
iperf [-h|--help] [-v|--version]
Server or Client:
-p, --port # server port to listen on/connect to
-f, --format [kmgKMG] format to report: Kbits, Mbits, KBytes, MBytes
-i, --interval # seconds between periodic bandwidth reports
-F, --file name xmit/recv the specified file
-B, --bind <host> bind to a specific interface
-V, --verbose more detailed output
-J, --json output in JSON format
--logfile f send output to a log file
-d, --debug emit debugging output
-v, --version show version information and quit
-h, --help show this message and quit
Server specific:
-s, --server run in server mode
-D, --daemon run the server as a daemon
-I, --pidfile file write PID file
-1, --one-off handle one client connection then exit
Client specific:
-c, --client <host> run in client mode, connecting to <host>
-u, --udp use UDP rather than TCP
-b, --bandwidth #[KMG][/#] target bandwidth in bits/sec (0 for unlimited)
(default 1 Mbit/sec for UDP, unlimited for TCP)
(optional slash and packet count for burst mode)
-t, --time # time in seconds to transmit for (default 10 secs)
-n, --bytes #[KMG] number of bytes to transmit (instead of -t)
-k, --blockcount #[KMG] number of blocks (packets) to transmit (instead of -t or -n)
-l, --len #[KMG] length of buffer to read or write
(default 128 KB for TCP, 8 KB for UDP)
--cport <port> bind to a specific client port (TCP and UDP, default: ephemeral port)
-P, --parallel # number of parallel client streams to run
-R, --reverse run in reverse mode (server sends, client receives)
-w, --window #[KMG] set window size / socket buffer size
-M, --set-mss # set TCP/SCTP maximum segment size (MTU - 40 bytes)
-N, --no-delay set TCP/SCTP no delay, disabling Nagle's Algorithm
-4, --version4 only use IPv4
-6, --version6 only use IPv6
-S, --tos N set the IP 'type of service'
-Z, --zerocopy use a 'zero copy' method of sending data
-O, --omit N omit the first n seconds
-T, --title str prefix every output line with this string
--get-server-output get results from server
--udp-counters-64bit use 64-bit counters in UDP test packets
[KMG] indicates options that support a K/M/G suffix for kilo-, mega-, or giga-
iperf3 homepage at: http://software.es.net/iperf/
Report bugs to: https://github.com/esnet/iperf

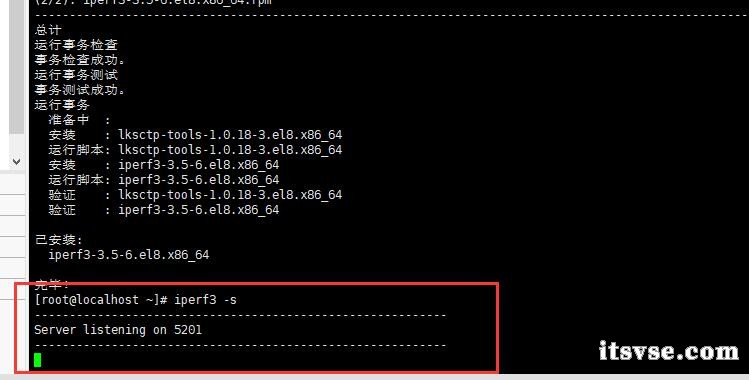
LINUX 服务器,以 CentOS 为例,可以使用 yum 命令安装 iPerf3 工具,命令如下:
服务端
将 Linux 服务器作为 server 端,执行命令如下:

客户端
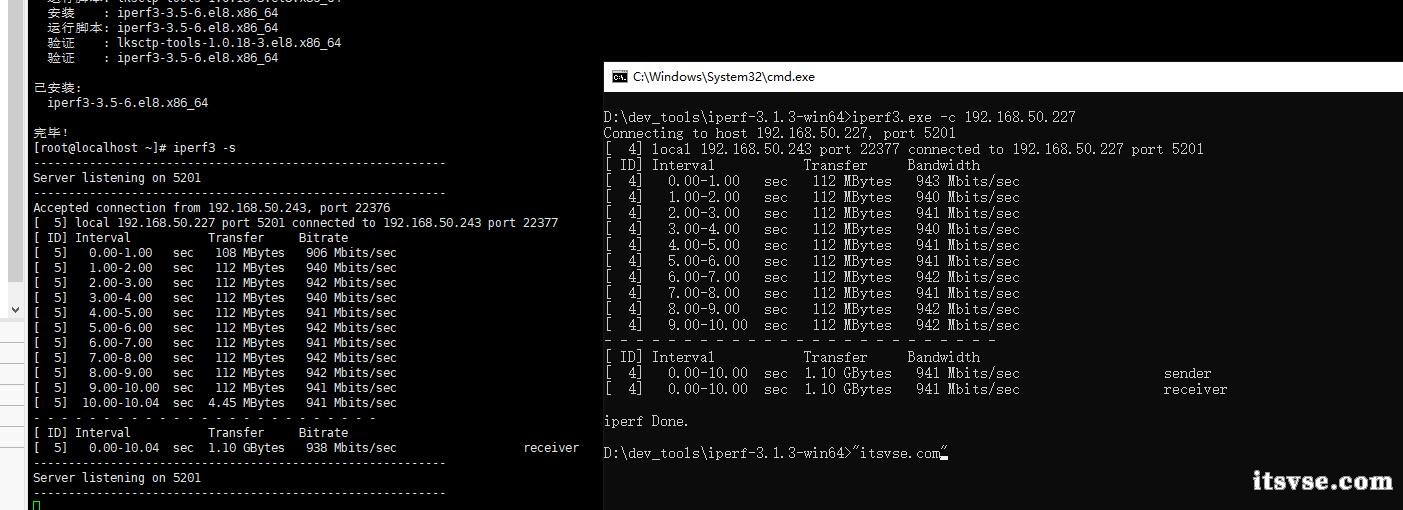
将我本机电脑作为 client 端,执行如下命令:
备注:192.168.50.227 是 sever 端的 ip 地址

总结
Server 端日志显示接收了来自 192.168.50.243,源端口 22376 的测试请求。Client端连续进行了10秒的测试,并显示了每秒传输的字节数,带宽信息;测试结束后会汇总发送和接收的统计信息。在Client连接关闭之后会继续侦听5201端口。
Connecting to host 192.168.50.227, port 5201
[ 4] local 192.168.50.243 port 22377 connected to 192.168.50.227 port 5201
[ ID] Interval Transfer Bandwidth
[ 4] 0.00-1.00 sec 112 MBytes 943 Mbits/sec
[ 4] 1.00-2.00 sec 112 MBytes 940 Mbits/sec
[ 4] 2.00-3.00 sec 112 MBytes 941 Mbits/sec
[ 4] 3.00-4.00 sec 112 MBytes 940 Mbits/sec
[ 4] 4.00-5.00 sec 112 MBytes 941 Mbits/sec
[ 4] 5.00-6.00 sec 112 MBytes 941 Mbits/sec
[ 4] 6.00-7.00 sec 112 MBytes 942 Mbits/sec
[ 4] 7.00-8.00 sec 112 MBytes 941 Mbits/sec
[ 4] 8.00-9.00 sec 112 MBytes 942 Mbits/sec
[ 4] 9.00-10.00 sec 112 MBytes 942 Mbits/sec
- - - - - - - - - - - - - - - - - - - - - - - - -
[ ID] Interval Transfer Bandwidth
[ 4] 0.00-10.00 sec 1.10 GBytes 941 Mbits/sec sender
[ 4] 0.00-10.00 sec 1.10 GBytes 941 Mbits/sec receiver
iperf Done.
测试 ESXI 下的虚拟机
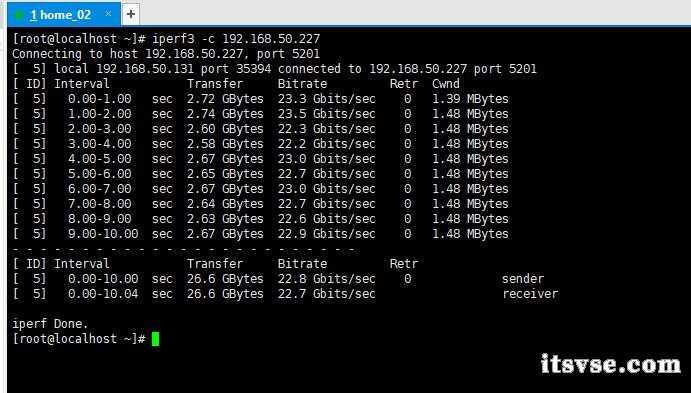
两台都是 CentOS 系统,在物理路由器都分配了内网 ip,通过内网 ip 进行测试,如下:

Connecting to host 192.168.50.227, port 5201
[ 5] local 192.168.50.131 port 35394 connected to 192.168.50.227 port 5201
[ ID] Interval Transfer Bitrate Retr Cwnd
[ 5] 0.00-1.00 sec 2.72 GBytes 23.3 Gbits/sec 0 1.39 MBytes
[ 5] 1.00-2.00 sec 2.74 GBytes 23.5 Gbits/sec 0 1.48 MBytes
[ 5] 2.00-3.00 sec 2.60 GBytes 22.3 Gbits/sec 0 1.48 MBytes
[ 5] 3.00-4.00 sec 2.58 GBytes 22.2 Gbits/sec 0 1.48 MBytes
[ 5] 4.00-5.00 sec 2.67 GBytes 23.0 Gbits/sec 0 1.48 MBytes
[ 5] 5.00-6.00 sec 2.65 GBytes 22.7 Gbits/sec 0 1.48 MBytes
[ 5] 6.00-7.00 sec 2.67 GBytes 23.0 Gbits/sec 0 1.48 MBytes
[ 5] 7.00-8.00 sec 2.64 GBytes 22.7 Gbits/sec 0 1.48 MBytes
[ 5] 8.00-9.00 sec 2.63 GBytes 22.6 Gbits/sec 0 1.48 MBytes
[ 5] 9.00-10.00 sec 2.67 GBytes 22.9 Gbits/sec 0 1.48 MBytes
- - - - - - - - - - - - - - - - - - - - - - - - -
[ ID] Interval Transfer Bitrate Retr
[ 5] 0.00-10.00 sec 26.6 GBytes 22.8 Gbits/sec 0 sender
[ 5] 0.00-10.04 sec 26.6 GBytes 22.7 Gbits/sec receiver
iperf Done.
查阅资料:https://communities.vmware.com/t ... Routes/ta-p/2783083
VM1 and VM2 are connected to same vSwitch called "vSwitch1" ,same port group called Production and also same VLAN called VLAN 20 and also both are running in the same ESXi host called ESX1. Network traffic between these VM's (VM1 & VM2) does not go to physical NICs on the ESXi host and this frames also not forwarded to physical network like physical switch and router because VM's will communicate within the vSwitch and results in achieving the increased network speed and lesser network latency.
我自己测试环境,两台虚拟机在同一个宿主机、同一个 vSwitch,但是并不在同一个端口组,好像也没有转发到物理网卡和物理网络。
|
上一篇:Windows 下使用 Pandoc 批量将 Markdown 转为 Word 文档下一篇:【实战】Spring Boot 之 AOP 动态修改请求参数值
|


 |小黑屋|架构师
( 鲁ICP备14021824号-2 )|网站地图